Chapter 1
Getting started
JustMakeQ is multimedia show control software: it plays a list of "cues" (audio, video, image, MIDI, OSC...) in order over the course of a show, fired one by one with the GO key.
Installing and launching JustMakeQ
Download the installer matching your system from your download area, then run it. On first launch, the welcome screen appears:
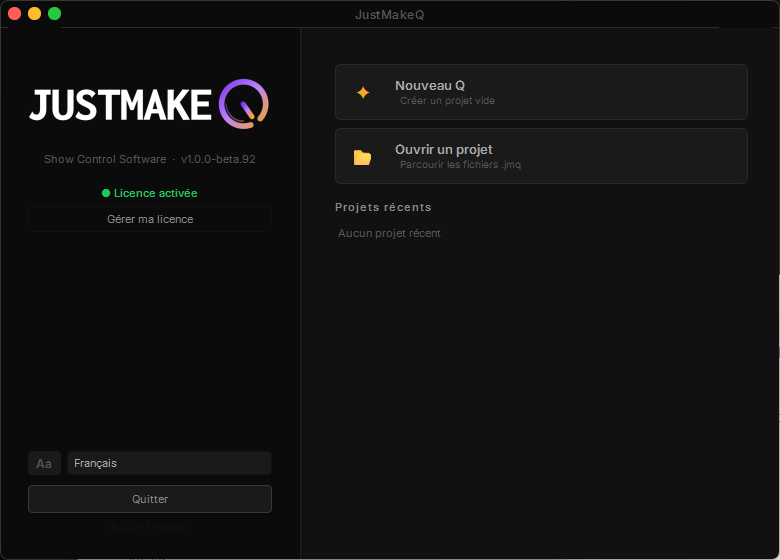
The welcome screen: create a new project, open an existing one, or pick up a recent project.
The licence status appears under the logo ("Licence activated" in green). If it is not yet the case, the "Manage my licence" button opens license.justmakeq.com in your browser: sign in (Breizhzion SSO), copy your licence key from your dashboard, then paste it into the application's activation window.
Creating a first project
Click "New Q" to start an empty project. The main window opens, with a still-empty cue list:
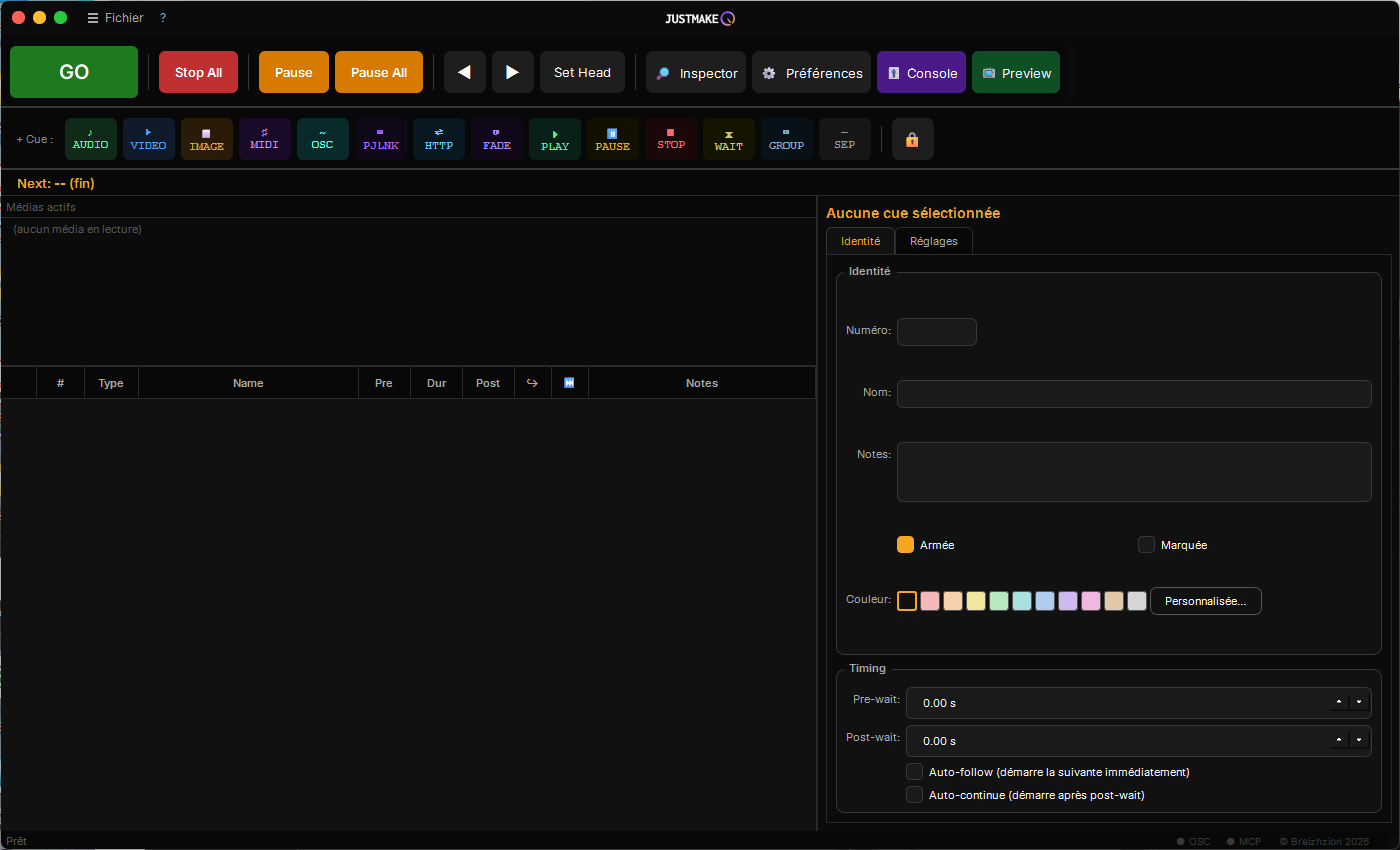
The main window: transport bar (GO/Stop/Pause) at the top, cue-adding buttons just below, cue list on the left, inspector on the right.
To add a cue, click its type in the "+ Cue" bar (Audio, Video, Image, MIDI, OSC, PJLink, HTTP, Fade, Play, Pause, Stop, Wait, Group, Sep). It appears in the cue list straight away:
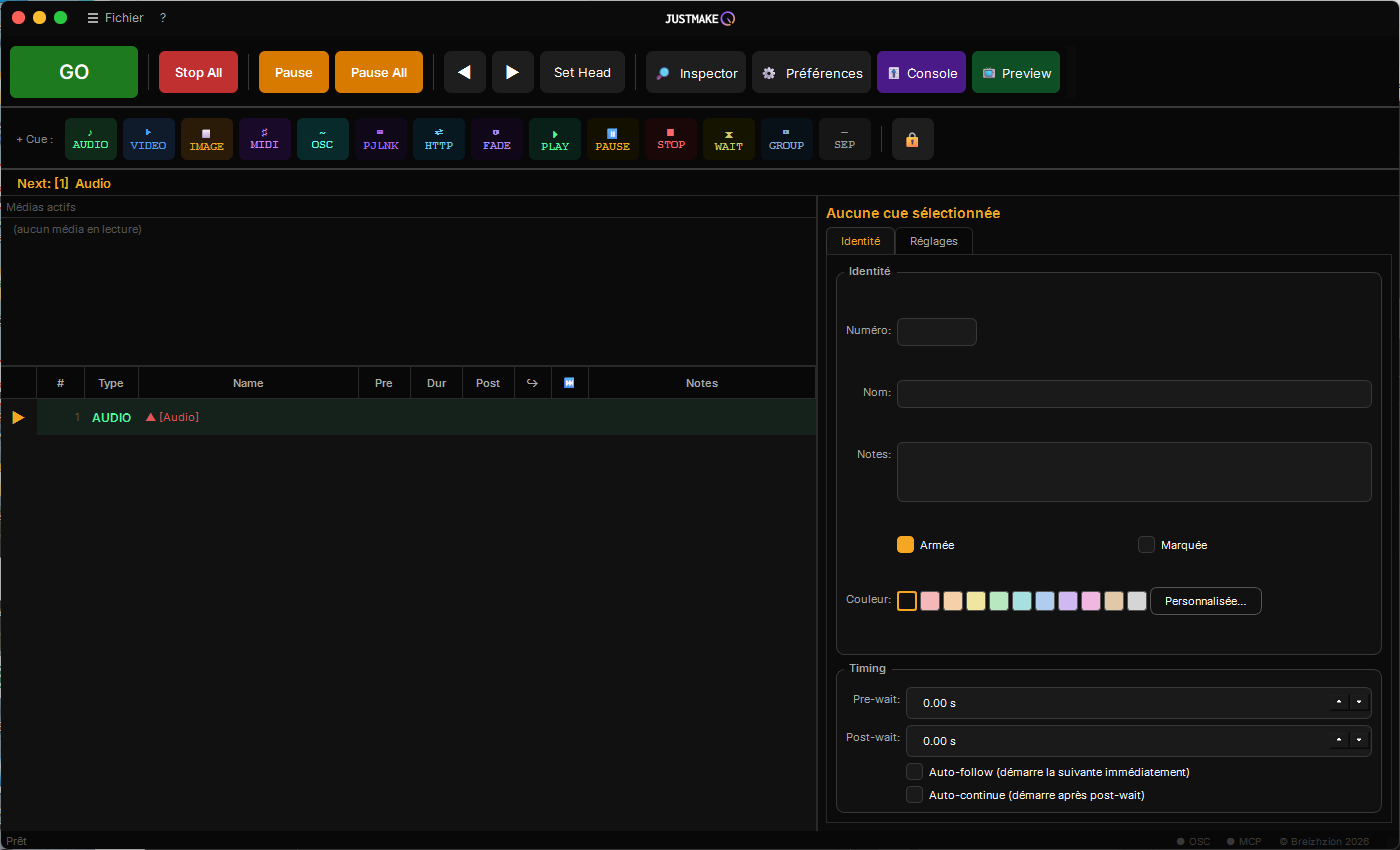
An Audio cue has just been added - it shows in red/orange until a file is associated with it.
Click the cue in the list to open it in the inspector (on the right): that is where all its parameters are set, starting with the file to play, in the "Settings" tab.
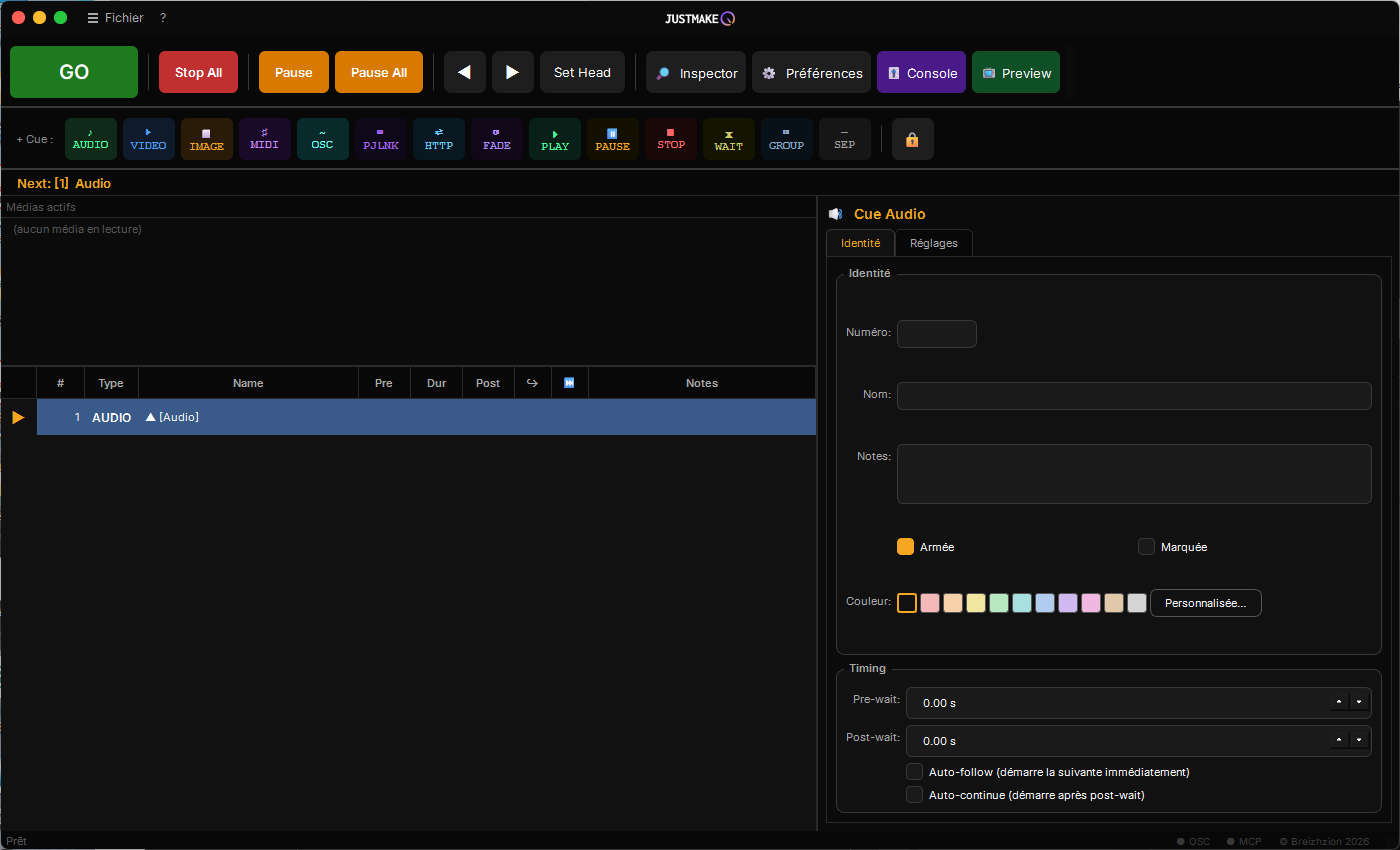
A selected cue: the inspector shows its identity (name, number, colour) and its timing (pre-wait, post-wait, auto-follow/auto-continue).
Running the show
Spaceor the GO button: fires the cue under the playhead (the orange triangle in the cue list) and moves the playhead to the next one.Escor the Stop All button: stops everything currently playing.Por the Pause button: pauses the selected cue; Pause All pauses everything (no default shortcut).Hor the Set Head button: moves the playhead to the selected cue without firing it.↓/↑: move the playhead to the next/previous cue without firing it.
These are the default shortcuts - they can be customised in Preferences > Keyboard shortcuts.
Each cue can have a pre-wait time (before it starts) and a post-wait time (before the next cue follows on automatically, if "Auto-continue" is ticked). With "Auto-follow" the next cue starts when the current one has finished; with "Auto-continue" it starts at the same time.
Importing a QLab show file
☰ File > Import a show file... brings in a show built in QLab 5 (a .qlab5 file, or an automatic .qlab5backup), without needing QLab at hand. The import creates a new cue list, named after the workspace, and makes it the active one: the open show and the original file are left untouched. QLab's cue numbers are kept. Names, notes, waits, chains (auto-continue, auto-follow), Audio and Video cues (level, in and out points, loop), Fade, Stop, Play, Pause, GoTo, Wait, OSC, MIDI cues and groups are brought over. A cue with no equivalent (Titles, Camera, Lighting, Script...) is kept disarmed, with its number and name. A report opens at the end and says, cue by cue, what was imported, partly imported or not imported. Media are looked for next to the workspace, then at their original location.
.qlab5 file opened directly (double-click or command line) is not imported: it is treated as a project and refused without a licence. The import is not available during a coworking session: close the session, import, then start it again.
Chapter 2
Preferences
The "Preferences" button in the toolbar opens a tabbed dialog gathering every setting that does not depend on a particular project (hardware, network, shortcuts). Each tab is detailed below; Keyboard shortcuts have their own chapter (3), as does AI control (13).
General
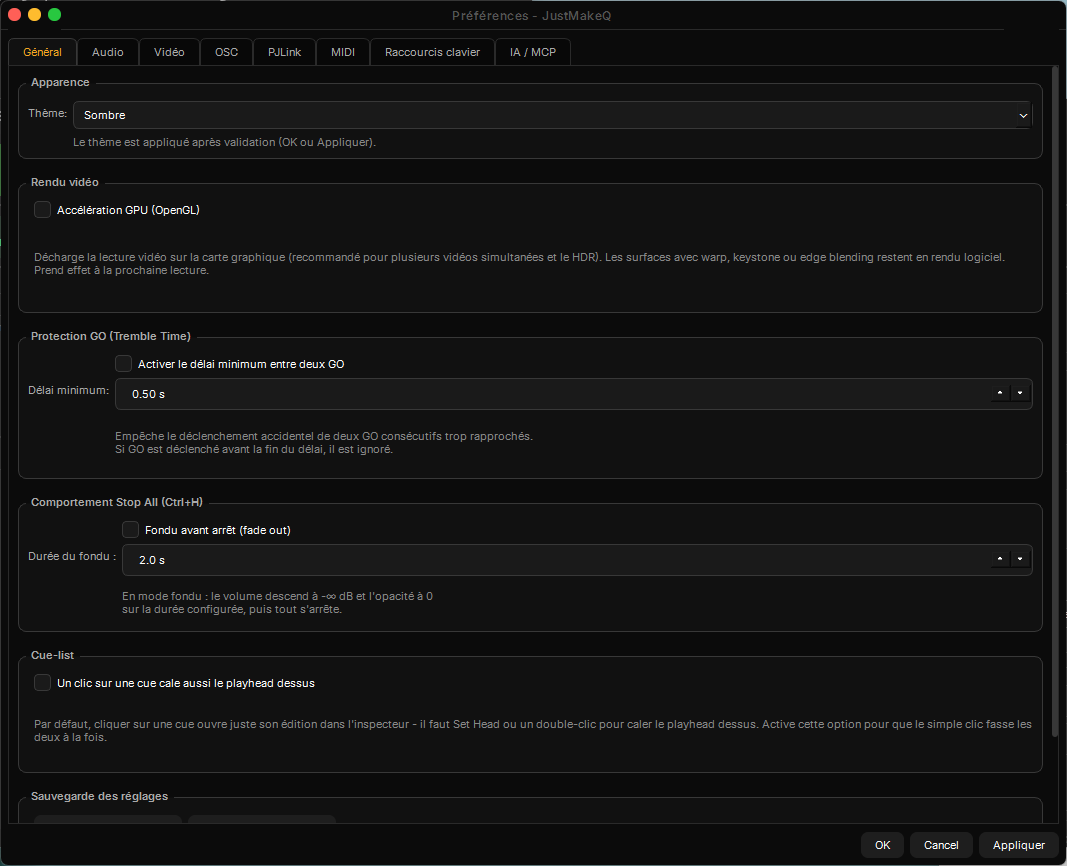
Theme, GPU acceleration for video, GO protection (minimum delay against double presses), Stop All behaviour (immediate stop or fade), cue-list click option, settings export/import.
"Export settings..." / "Import settings..." (at the bottom) save or transfer everything that is hardware-independent (theme, language, OSC patches, servers, shortcuts) to a file - handy for duplicating your configuration on another machine without redoing every setting by hand. Screens, sound cards and video surfaces specific to each installation are never included.
Video rendering. In Preferences > General > Video rendering, the “GPU acceleration (OpenGL)” box is unticked by default and takes effect at the next playback. When ticked, rendering goes through the graphics card, which matters most for several videos at once and for 4K. It covers the surface geometry: warp, keystone, edge blending, shape, mask (from the shape or from an image), mapping aid, spherical and 360° media (equirectangular, domemaster, double fisheye on a ball or a cylinder) and opacity fades, and the YUV to RGB conversion of NV12, P010 and YUV420P frames is also done on the graphics card. Measured on a modest PC (GTX 1060 card, i5-9400F processor): a 4K video at 60 frames per second with warp, keystone, edge blending and mask stays around 58 to 60 frames per second with GPU rendering, against 18 to 23 with software rendering. Still in software rendering: the 3D rotation of a cue, Text cues, video effects, the inspector preview, the preview monitor while it is open, a surface whose settings are unreadable, and a computer where OpenGL is not available. Under the box, the line “Last video output: GPU rendering” or “Last video output: software rendering” (reason) tells what really happened at the last playback; when acceleration is ticked but not used, the reason for the fallback is also written in the log (menu ? > View logs...).
HDR videos. JustMakeQ applies no HDR conversion of its own: Qt itself converts an HDR video (HLG or PQ, BT.2020) to SDR BT.709, and the software displays that result as it is, in software rendering as in GPU rendering. The output is therefore always SDR (on a computer where Qt has no OpenGL, it does not convert, and the video is shown without conversion). An iPhone HDR video is no longer converted twice, which used to make it too dark and oversaturated.
Audio > Routing
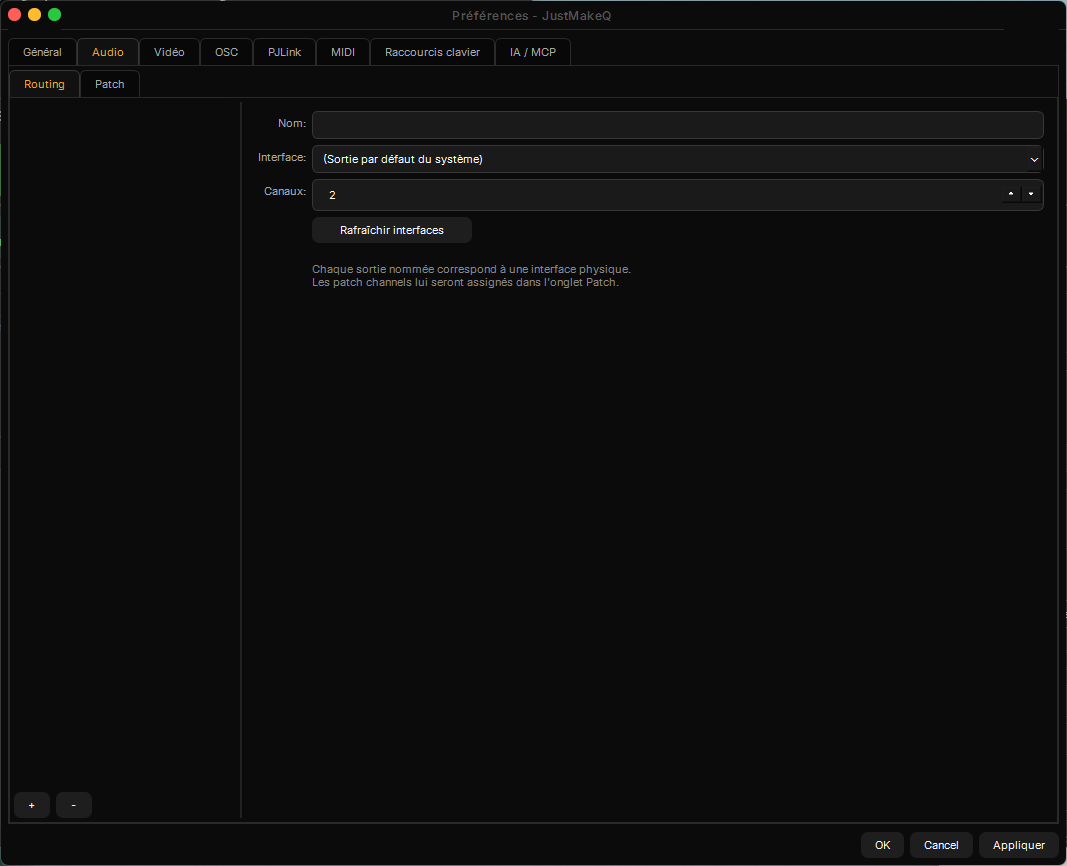
Each physical output (sound card) is declared once: name, interface, number of channels.
Audio > Patch
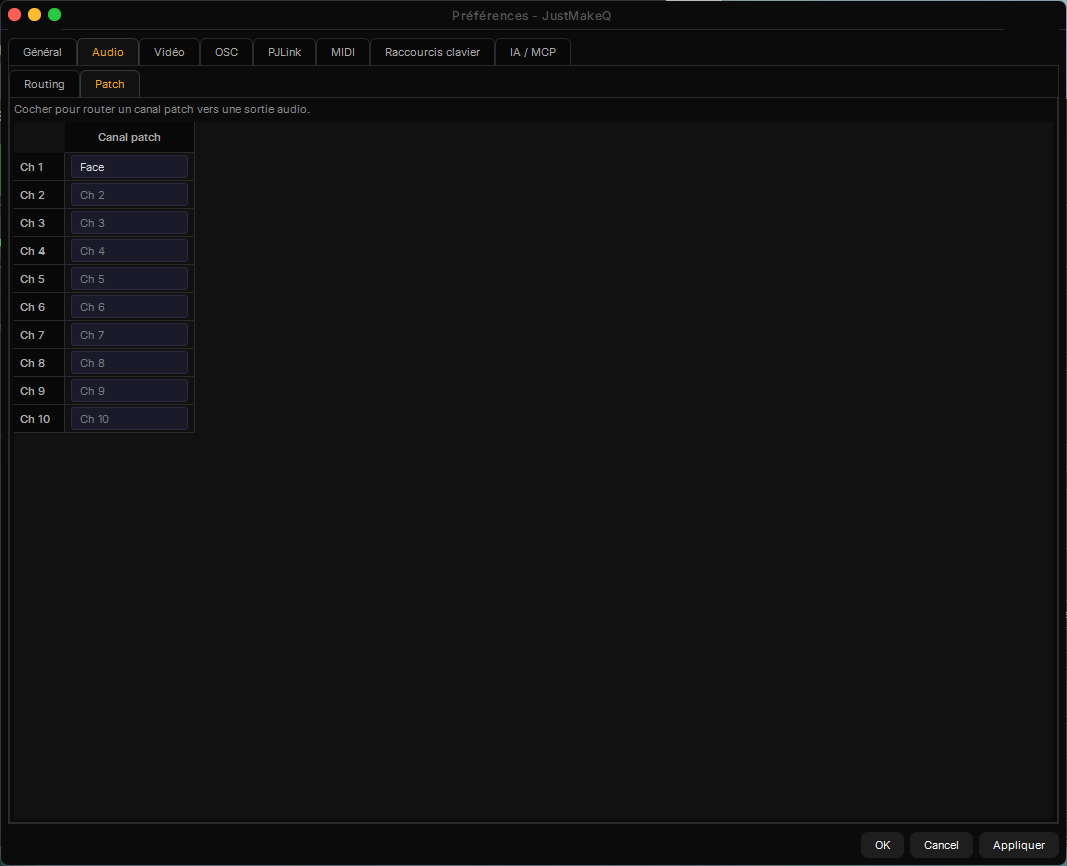
Each patch channel (used in an Audio cue's mixer, chapter 7) is freely named here and routed to a real channel of an output declared in Routing.
Audio > Inputs
Up to 5 named live audio inputs, used by In Audio cues (chapter 15). Each input is either a "Device" (a sound card or USB console input, including Dante channels exposed by Dante Virtual Soundcard, with a choice of how many channels to capture) or "NDI" (the audio of an NDI source on the network). The "Refresh devices" button reloads the list and discovers NDI sources.
Video > Routing
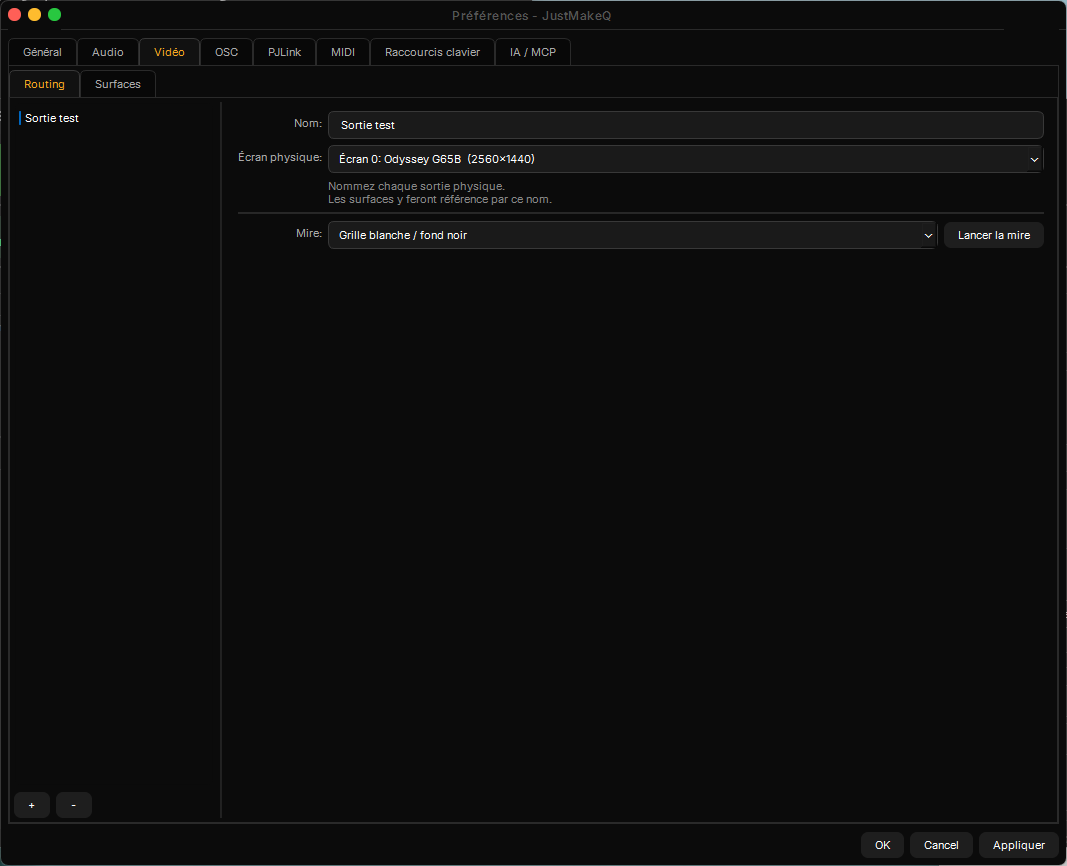
Each physical output (screen) is named once; a calibration pattern (grid, checkerboard...) can be launched directly to check the framing on the right screen.
Video > Surfaces
A "surface" links a rectangular area to an output declared in Routing - it is what a Video/Image cue picks as its destination (chapter 8). "Geometry" tab:
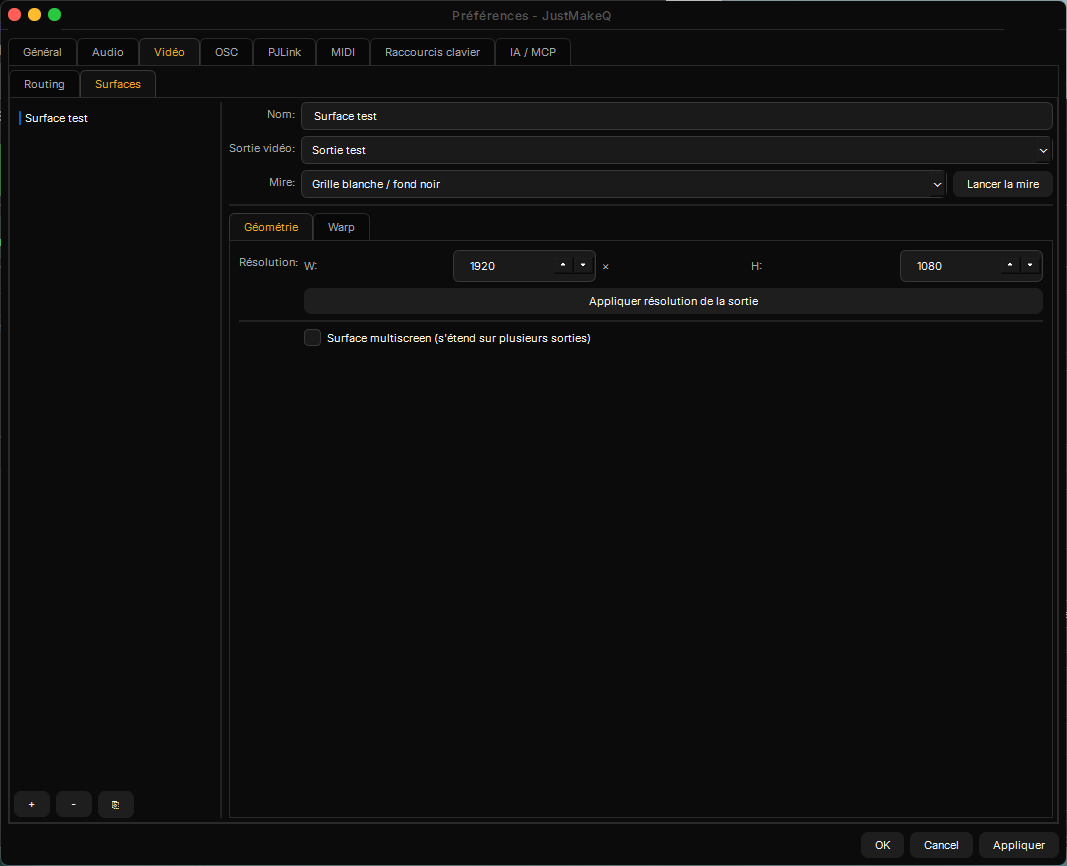
Name, target video output, calibration pattern specific to this surface, resolution (with a button to take the output's own), and a "multiscreen surface" option to span several outputs.
"Warp" tab, to correct the distortion of a projection (uneven wall, projector angle):
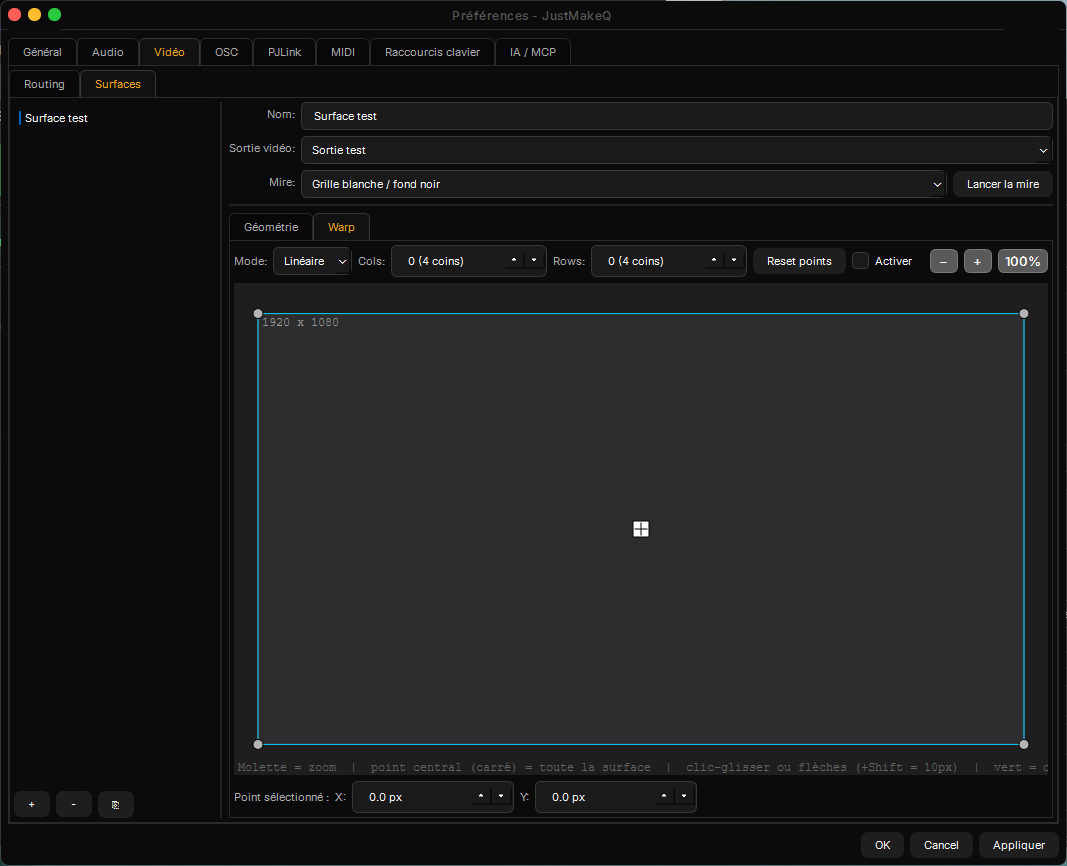
Warp mesh (Linear or Bézier mode), number of point rows/columns, movement with the mouse (click and drag) or the keyboard (arrows, +Shift for a 10px step), centre point to move the whole surface, wheel zoom.
Vidéo > Inputs
Up to 5 named live video inputs, used by In Video cues (chapter 15). Each input is either a "Device" (webcam or capture card, with a choice of associated audio source: "(auto)" picks the same device's microphone) or "NDI" (a network source, with its embedded audio). The A/V sync field, in milliseconds, aligns sound with picture: negative = delay the picture, positive = delay the sound, adjustable live while a cue is playing. Inputs are identified persistently: unplugging/replugging a device does not break your cues.
OSC > Sortant (Patch)
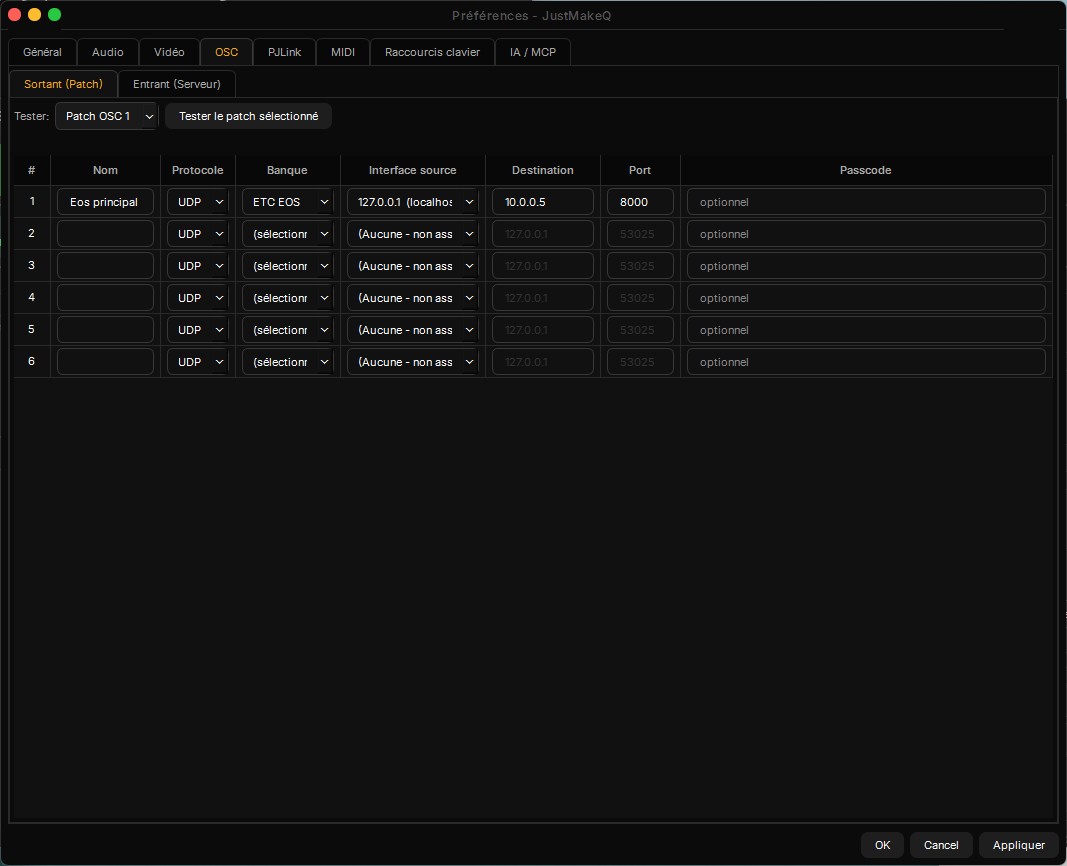
Up to 6 patches, each with its protocol, its bank (target console/software), its source network interface, its destination and an optional password depending on the protocol. Used by OSC cues (chapter 10).
OSC > Entrant (Serveur)
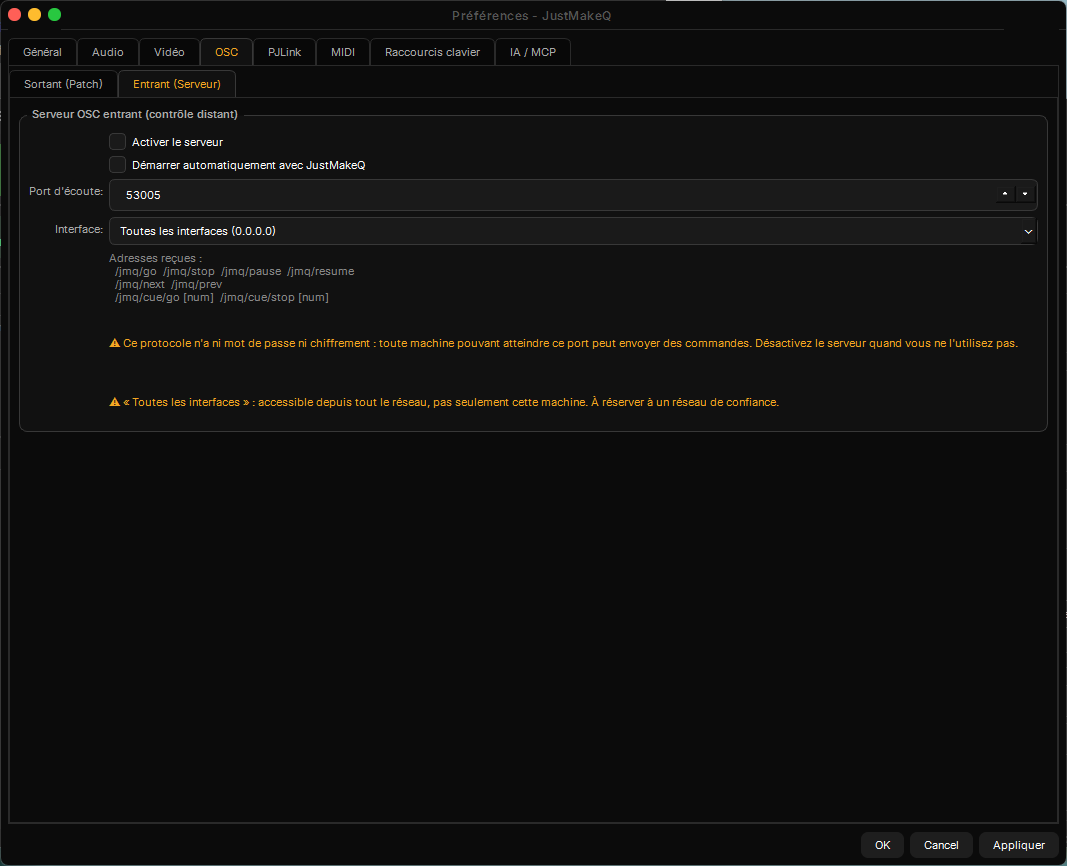
Receives OSC commands to control JustMakeQ remotely (GO, Stop, Pause, next/previous cue, jump to a specific cue number).
UDP by default, TCP as an option. The server receives over UDP. For a controller that only sends over TCP, tick “Also accept OSC over TCP” in Preferences > OSC > Incoming (Server), then Apply or OK: the server then also listens over TCP, on the same port number as UDP. The box is unticked by default: as long as it is, no TCP connection is accepted. The panel shows the transport: “UDP only”, “UDP and TCP”, or “UDP only (TCP unavailable: reason)” if the TCP port is already taken by another program (UDP keeps working). The two ways of framing OSC over TCP, OSC 1.0 (each packet preceded by its size) and OSC 1.1 (SLIP), are recognised automatically, connection by connection. A packet larger than 64 KiB closes the connection, and at most 16 simultaneous connections are accepted.
PJLink
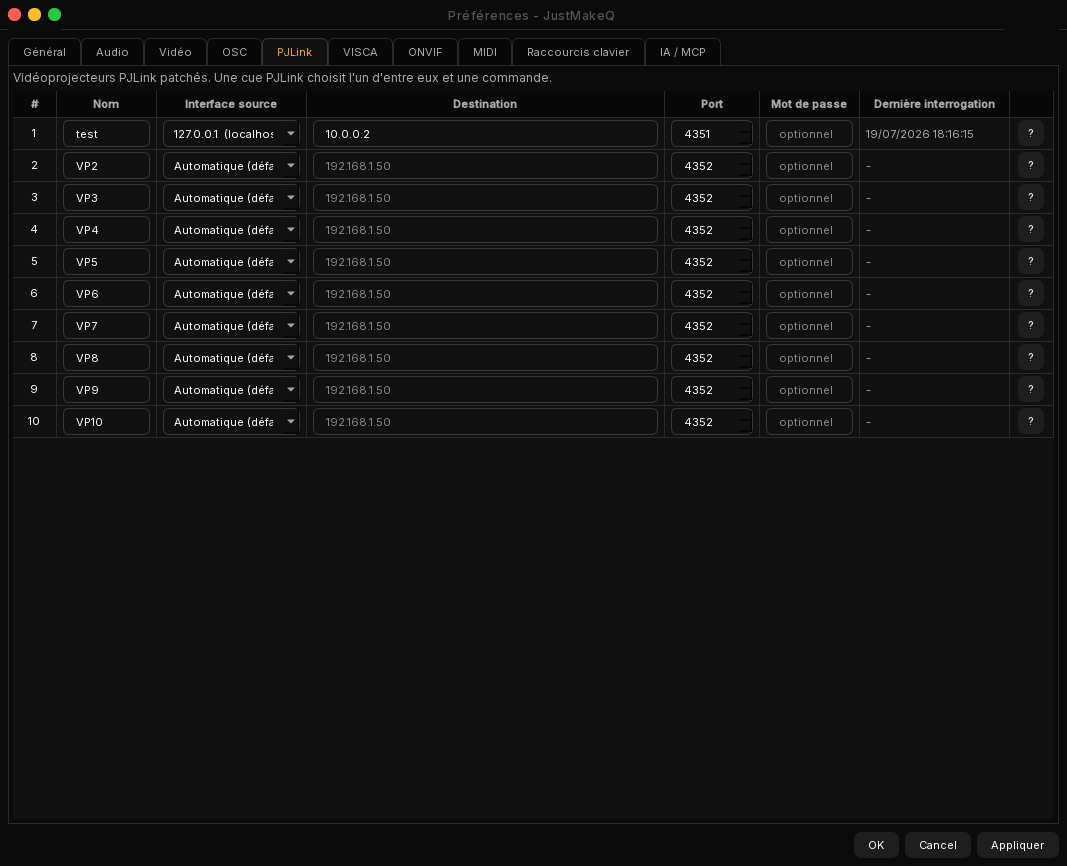
Up to 10 patched projectors (name, source interface, destination, port, optional password), used by PJLink cues (chapter 11). The "?" button queries the projector's status straight from this screen.
MIDI
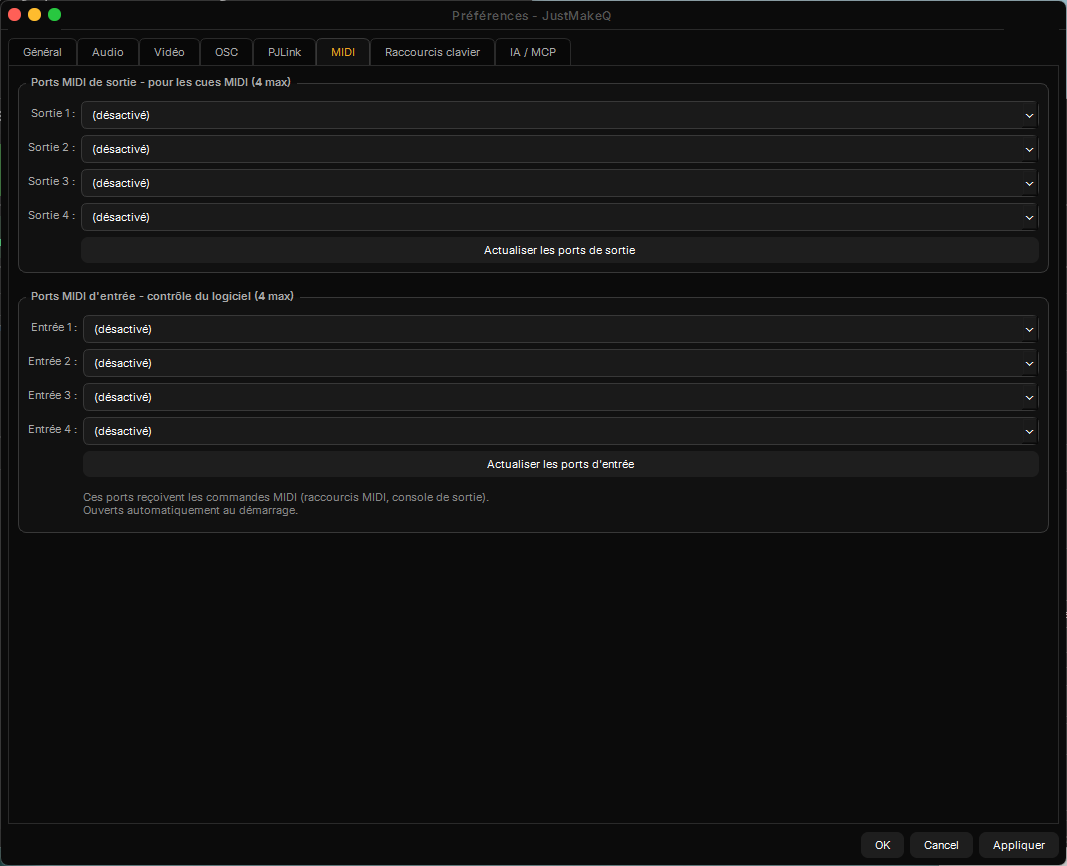
Up to 4 output ports (for MIDI cues, chapter 9) and 4 input ports (MIDI Learn shortcuts, mixing console), opened automatically at startup.
Chapter 3
Keyboard shortcuts
Preferences > Keyboard shortcuts lets you customise each shortcut, and also offers a "MIDI Learn" to drive the transport from a physical MIDI controller (footswitch, control surface...).
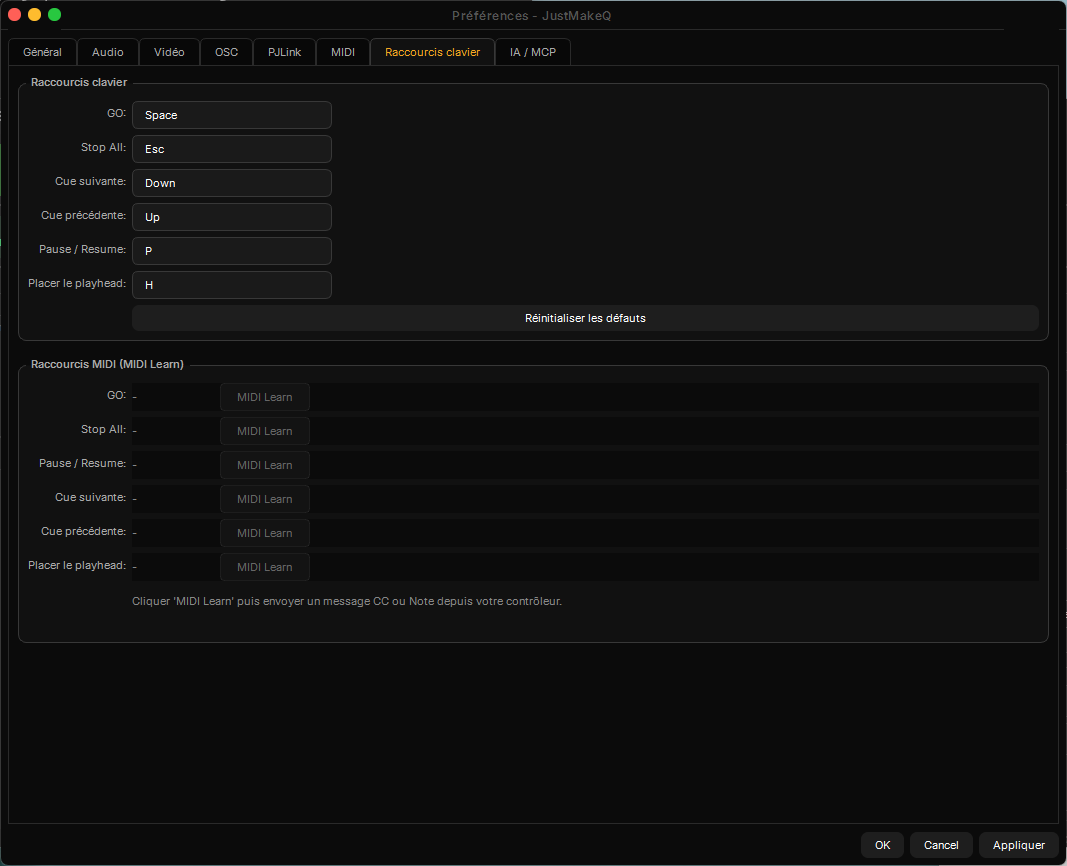
Default keyboard shortcuts, with MIDI Learn shortcuts just below (a click on "MIDI Learn" then a CC or Note message binds the control).
| Action | Default key |
|---|---|
| GO | Espace |
| Stop All | Échap |
| Next / previous cue | ↓ / ↑ |
| Pause / Resume | P |
| Move the playhead (Set Head) | H |
"Reset to defaults" restores these original values in one click if a customisation causes trouble.
Chapter 4
The interface
The main window is split into three areas:
Top to bottom: transport bar, cue-adding bar, then the three areas (Active media, cue list, inspector).
- Transport bar (top): GO, Stop All, Pause, Pause All, previous/next navigation, Set Head, then the Inspector, Preferences, Console (mixing) and Preview (preview monitor) buttons.
- "+ Cue" bar: one button per cue type (see chapter 5), and a padlock to lock drag-and-drop in the cue list (prevents accidental reordering during a show, without blocking the addition of new files).
- Active media (top left): a live list of what is actually playing, regardless of the playhead's position in the cue list.
- Cue list (bottom left): the show's sequence. Columns: # (number), Type, Name, Pre/Dur/Post (times), loop, marker, Notes. The orange triangle marks the playhead - the next cue that will fire on GO.
- Inspector (right): settings for the selected cue, on two tabs - "Identity" (name, number, colour, timing, auto-follow/auto-continue, common to all types) and "Settings" (specific to the cue type, see the following chapters).
The "☰ File" menu gives access to New project, Open, Save, Create a bundle (gathers the project and its media into a single portable folder) and Coworking session... (chapter 16). The "?" menu opens the help, the diagnostic logs and licence management.
Chapter 5
Cue types
JustMakeQ offers 20 cue types, each with its own colour in the cue list so you can spot them at a glance:
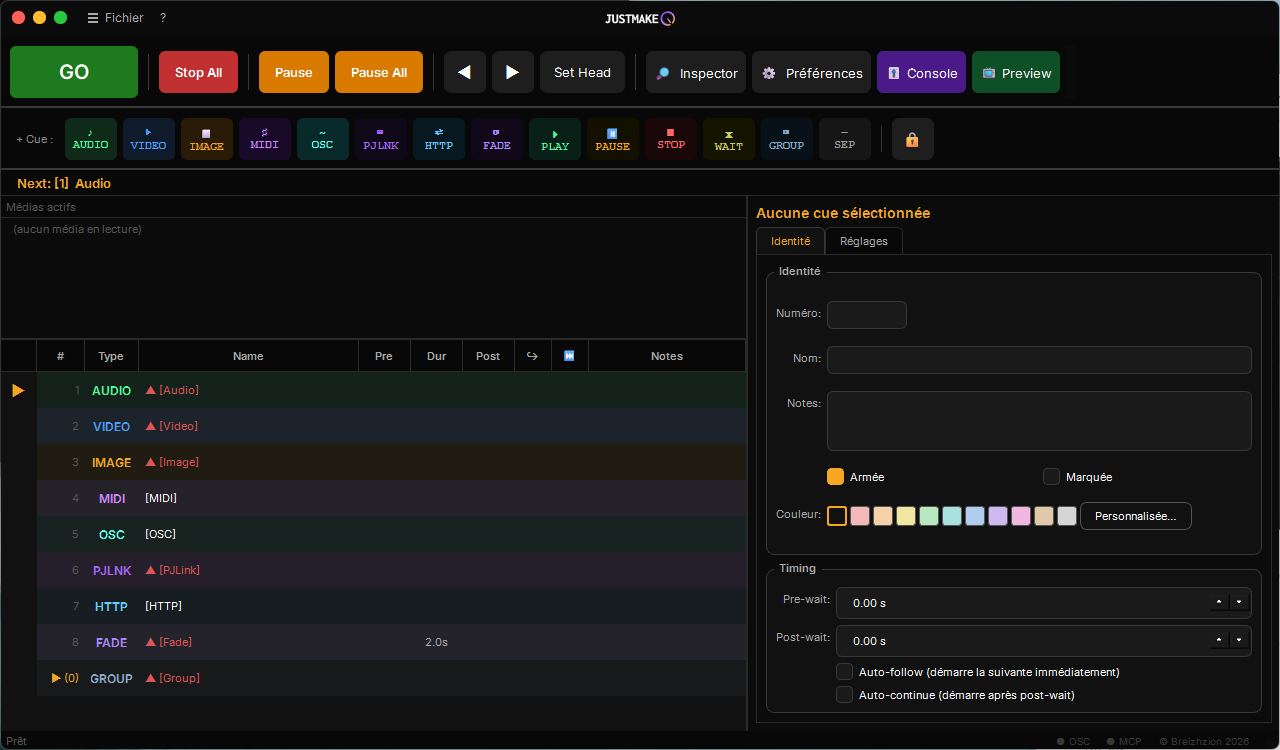
Top to bottom: Audio, Video, Image, MIDI, OSC, PJLink, HTTP, Fade, Group - each with its own colour.
- Audio: playback of a sound file, with per-channel routing (chapter 7).
- Video / Image: display on a projection surface, with geometry and effects (chapter 8).
- Stream: display of a live network video feed on a projection surface (chapter 13).
- In Video: display of a live video input - webcam, capture card or NDI source - with the source's sound (chapter 15).
- In Audio: playback of a live audio input - sound card, USB console, Dante or NDI audio - through the standard routing (chapter 15).
- Text: display of styled text on a surface, designed for surtitling, with .srt file import (chapter 16).
- MIDI: sending of one or more MIDI messages (chapter 9).
- OSC: sending of an OSC command, through a preconfigured bank or manually (chapter 10).
- PJLink: control of a networked projector (chapter 11).
- HTTP: web request to a third-party service, with ready-made templates (chapter 12).
- VISCA / ONVIF: pan/tilt/zoom control of a motorised camera (chapter 14).
- Fade: gradually changes the volume, opacity, position or speed of another cue already running.
- Play / Pause: fires or pauses one specific other cue, without advancing the main playhead.
- Stop: stops one specific cue (or everything, if no target is chosen).
- Wait: a simple timed pause in the sequence.
- GoTo: moves the playhead to another cue in the list (loops, branches).
- Group: gathers several cues, played in sequence ("Playlist") or all at once ("Simultaneous") - see chapter 6.
- Sep (separator): a plain visual/chapter marker in the cue list, with no effect on playback; GO steps over it automatically.
Chapter 6
Running a show
The playhead (the orange triangle) moves on by one cue at each GO. Each cue can have a pre-wait time (before it starts) and a post-wait time. Two checkboxes in the Identity tab control automatic chaining:
- Auto-follow: the next cue starts when the current one has finished (after its post-wait).
- Auto-continue: the next cue starts automatically at the same time as the current one, after the current cue's post-wait, with no further GO press.
A disarmed cue ("Armed" box unticked) follows the same delays as a normal cue but never plays its media - useful for rehearsals without firing a media file (video, sound) that is not ready yet, or to disable a cue temporarily without deleting it. Its name appears struck through in the cue list.
Groups: Playlist or Simultaneous
A Group cue gathers several child cues (dragged into it, or selected then "Group" from the right-click menu). The mode is chosen in the Settings tab:
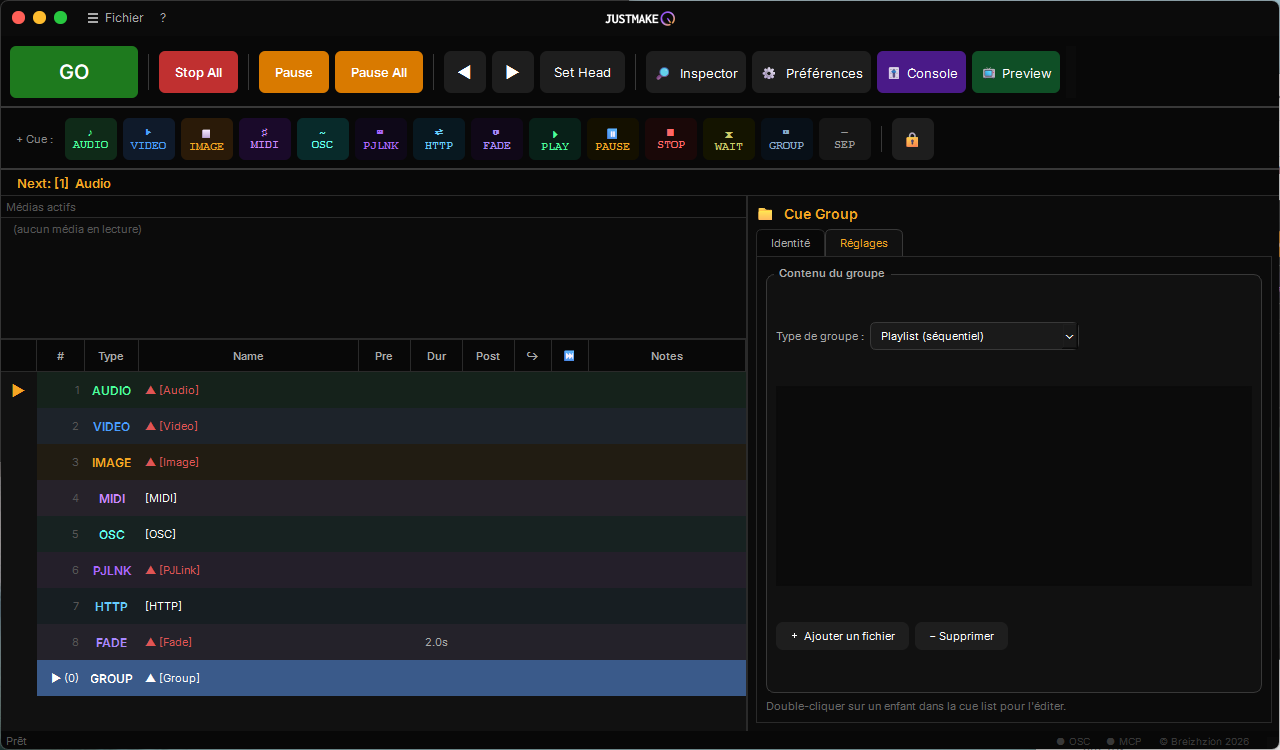
The group mode is chosen here: Playlist (sequential) or Simultaneous.
- Playlist (sequential): the child cues follow one another, each respecting its own pre/post-wait.
- Simultaneous: all child cues start at the same time.
The group shows its colour in the cue list according to its mode, and folds/unfolds with the "<"/">" keys once selected.
Chapter 7
Audio cue
The Settings tab of an Audio cue lets you choose the file, set a start/end point (to play only an excerpt), a loop, a playback speed, and the routing to the physical outputs.
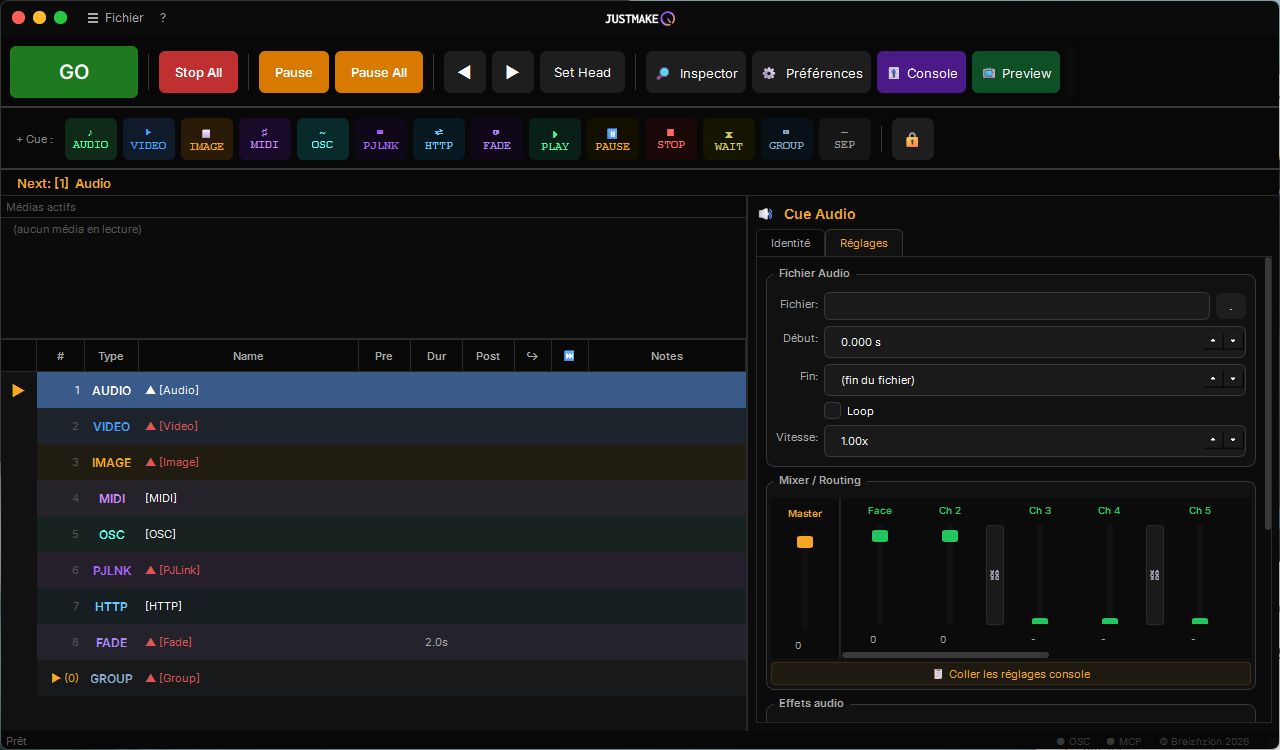
File, Start/End, Loop, Speed, then the per-channel mixer (Master + channels named in Preferences > Audio).
- Speed: from 0.25x to 4x, changes the pitch at the same time (like a variable-speed tape) - no pitch correction, deliberately simple.
- Mixer / Routing: one fader per configured output channel (named in Preferences > Audio > Routing), plus the Master. "Paste console settings" takes over the levels set live on the Output console (chapter 9).
- Audio effects (below the mixer): Bass/Treble EQ, compressor/limiter, 16-band equaliser (dedicated graphical interface), reverb (algorithmic, no convolution) and delay - only one effect active at a time per cue.
A Fade cue targeting this cue can gradually change the volume or the speed already running.
Chapter 8
Video and Image cues
Before firing a Video or Image cue, you need at least one projection "surface" defined in Preferences > Video > Surfaces (chapter 2), itself linked to a physical output (screen) declared in the Routing tab.
Once a surface is available, the Video/Image cue offers:
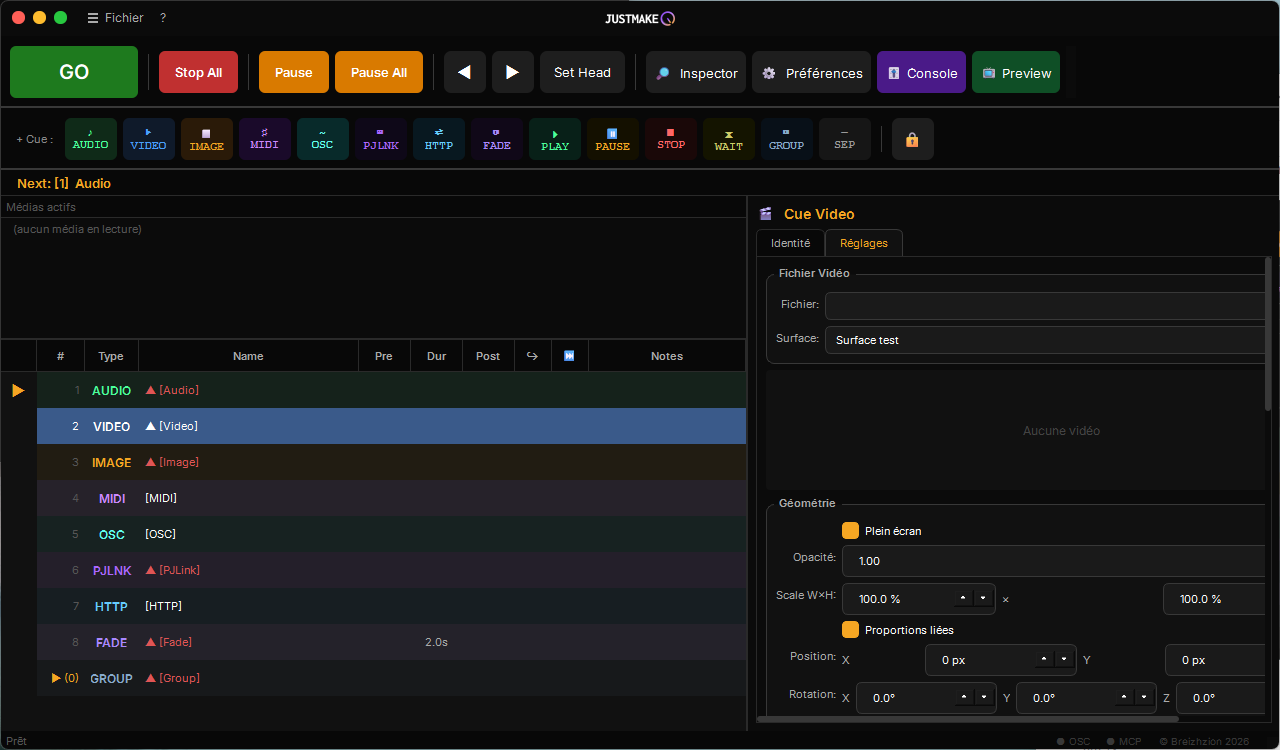
File, target surface, then Geometry (full screen, opacity, scale, position, 3D X/Y/Z rotation).
- Geometry: scale, position, 3D rotation, opacity - all can be animated gradually by a Fade cue.
- Warp (in the surface editor, Preferences > Video > Surfaces, chapter 2): mesh-based distortion, to correct a projection onto an uneven support or a projector angle.
- Spherical media: format of a 360° video, a domemaster or a dual fisheye, projected onto a ball or a cylinder (chapter 18).
- Effects (common to Video/Image, below Geometry): saturation, contrast, brightness, black and white, sepia.
- Playback speed (Video only): 0.25x to 4x, picture and embedded sound stay in sync.
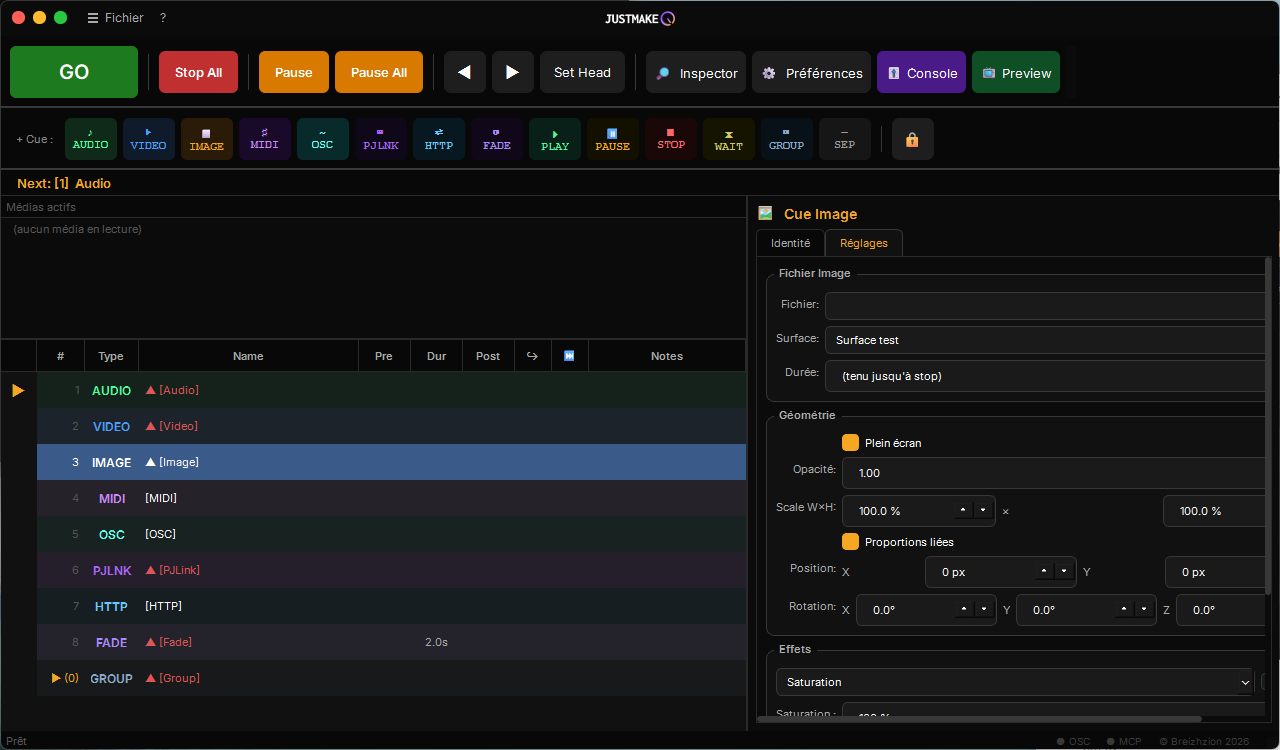
An Image cue shares the same Geometry and the same Effects as a Video cue (here with Saturation selected).
The "Preview" button in the transport bar opens a preview made up of every media currently active on the chosen output, without firing anything - handy for checking framing before the show.
Chapter 9
MIDI cue and mixing console
A MIDI cue sends one or more messages on a configured output port:
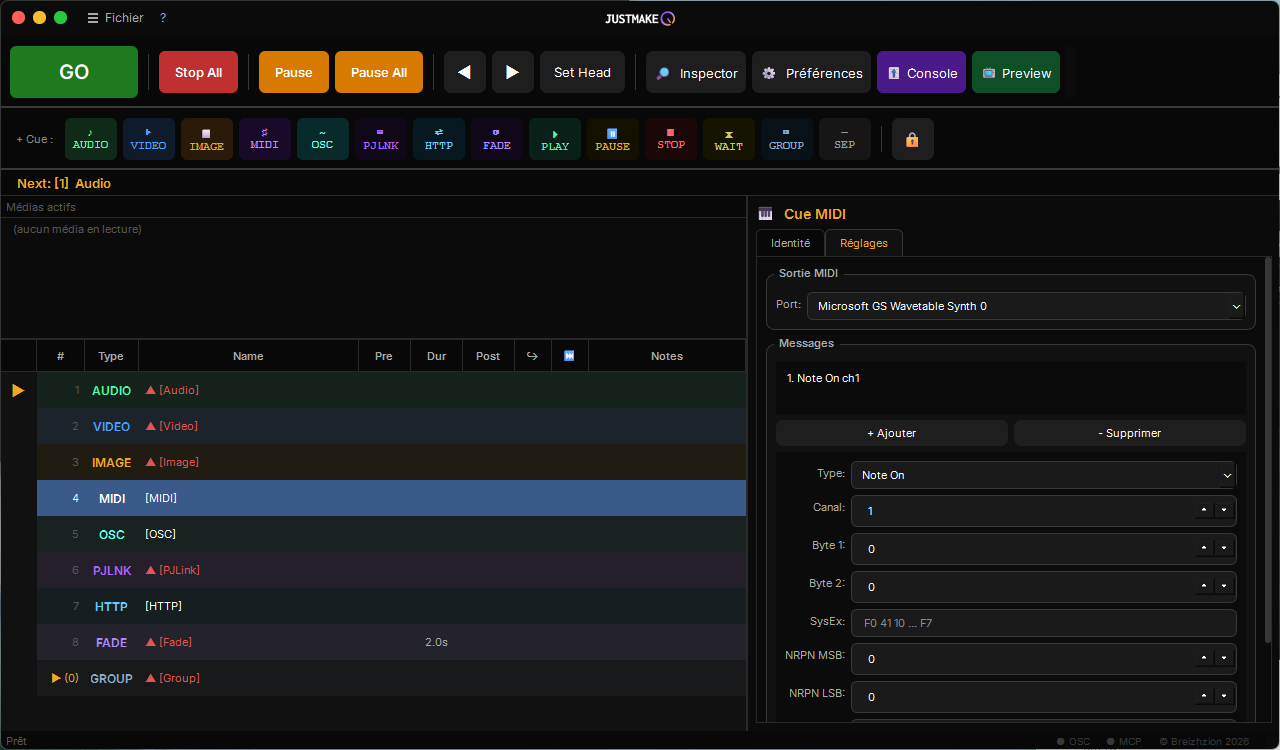
Output port, then a list of messages (Note On/Off, Control Change, SysEx, NRPN...), freely added or removed.
Ports are declared in Preferences > MIDI (up to 4 outputs and 4 inputs):
Input ports receive MIDI commands (MIDI Learn shortcuts, mixing console) and open automatically at startup.
Output console
The "Console" button in the transport bar opens a mixing console: Master + 10 output channels, with VU meters and per-fader MIDI Learn assignment (to drive each channel from a physical controller).
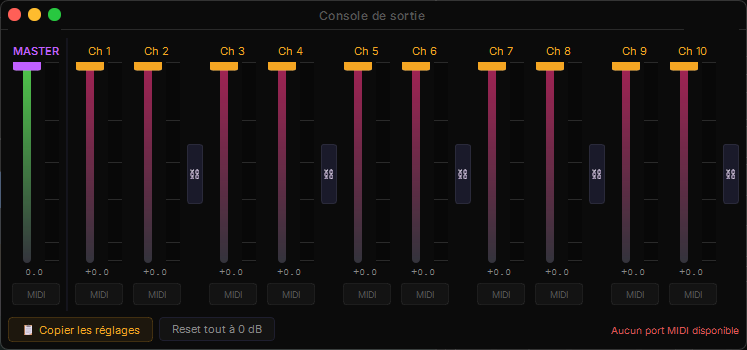
"Copy settings" carries these levels over into the mixer of a selected Audio cue; "Reset all to 0 dB" returns every fader to its neutral value.
Chapter 10
OSC cue
An OSC cue sends a command to third-party software or a console. Two modes in the Settings tab:
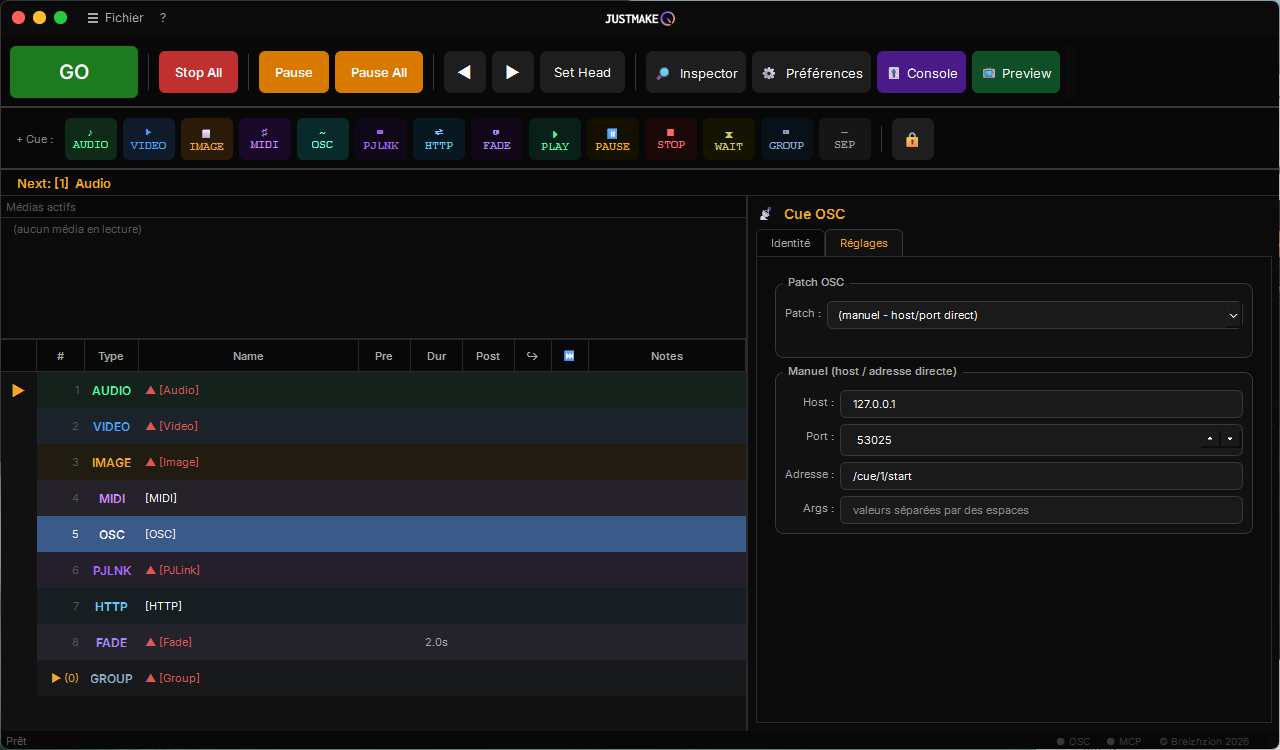
"Manual" mode: host/port/OSC address entered directly, with arguments (Args) whose type - number, boolean or text - is detected automatically.
- Patch (preconfigured bank): selects a patch declared in Preferences > OSC > Outgoing, then picks a command from a list already tailored to the target product (ETC Eos, QLab, Midas/Behringer, grandMA3, Resolume, OBS...).
- Manual (host / direct address): for a need no bank covers, with host/port/address/arguments entered by hand.
Outgoing patches and the incoming listening server are configured in Preferences > OSC:
Up to 6 outgoing patches, each with its protocol, its bank, its source network interface, its destination and an optional password depending on the protocol.
JustMakeQ's default ports: 53025 (generic patch) and 53026 (local incoming server), deliberately distinct from QLab's default ports.
Chapter 11
PJLink cue
PJLink is a standard network protocol for controlling projectors (power on, power off, input selection, picture mute...). Projectors are patched once in Preferences > PJLink (10 slots):
Name, source network interface, destination IP address, port and optional password for each projector. The "?" button at the end of the row queries the projector directly (name, manufacturer, model, power, active input, shutter, lamp, errors); the date of the last query stays visible in its column.
A PJLink cue then simply picks a patched projector and a command:
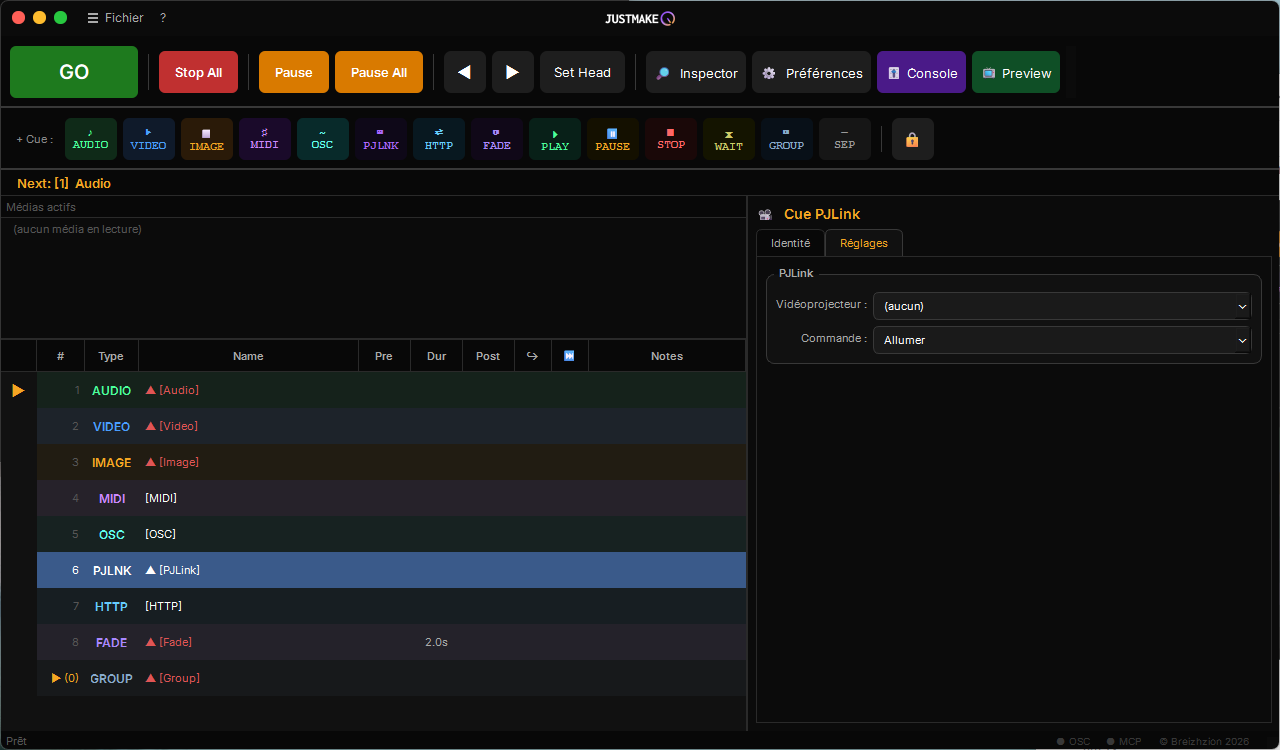
The cue renames itself automatically to reflect the chosen projector and command.
Chapter 12
HTTP cue
The HTTP cue sends a web request (GET/POST/PUT/PATCH/DELETE) to a third-party service - handy for driving just about any device or software exposing a web API (connected lighting, notifications, home automation...).
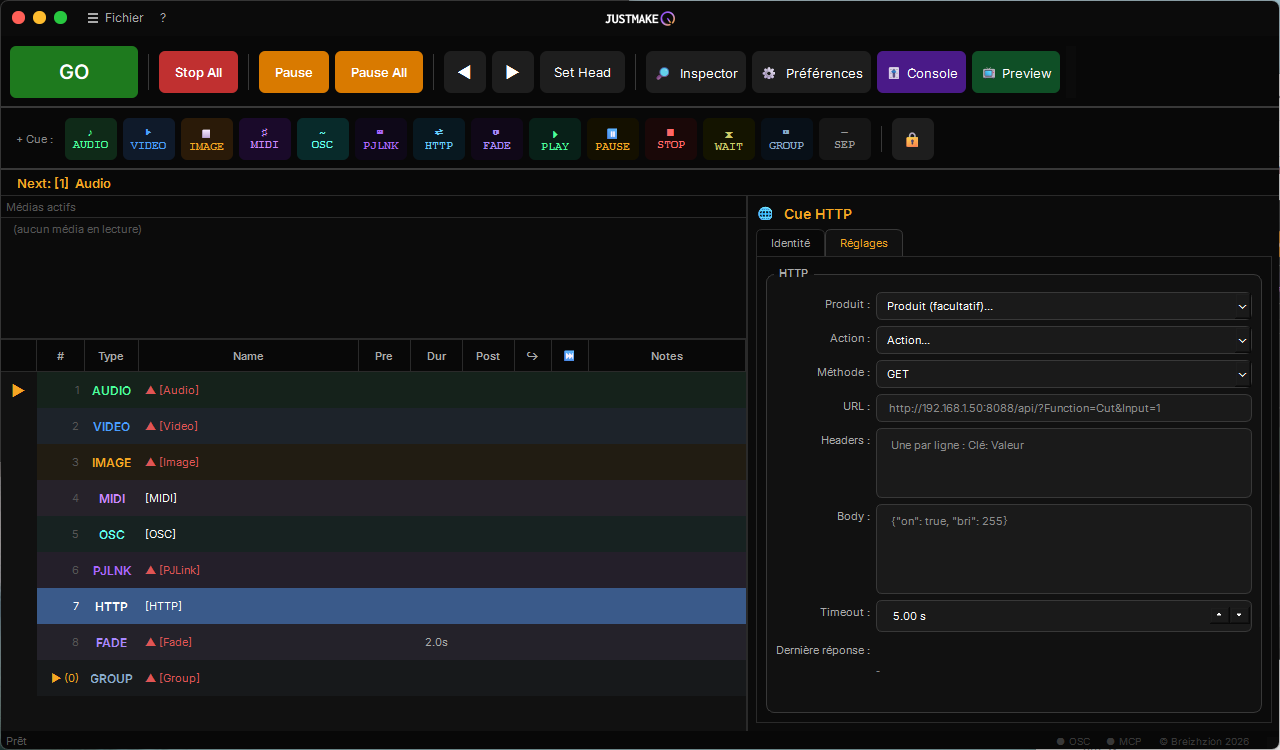
The "Product" then "Action" cascade offers ready-made templates; method, URL, headers and request body remain freely editable.
Pre-filled templates exist for around fifteen common products (vMix, WLED, Bitfocus Companion, Philips Hue, Shelly, Home Assistant, Discord, Pushover, ntfy, PTZOptics-compatible PTZ cameras...), so you do not have to write each request yourself. The "Last response" field shows the server's reply live, useful to check that a request works before the show.
The "Retry automatically after" option resends the request once, after the chosen delay, if the first attempt fails (a one-off network glitch) - the cue only goes into error if both attempts fail.
Chapter 13
Live stream cue (Stream)
The Stream cue displays a live network video feed on a projection surface - IP camera, encoder or video mixer exposing a standard stream. It shares the same geometry (position, scale, rotation), the same video effects and the same audio mixing (per-channel routing, effects) as the regular Video cue (chapter 8); only the source differs.
Recognised protocols, detected automatically from the prefix of the URL you enter: rtsp://, rtsps://, rtmp://, rtmps://, srt://, rist://, udp://, rtp://, tcp://, plus http:///https:// for an HLS (.m3u8) or DASH (.mpd) stream.
Chapter 14
VISCA and ONVIF cues (PTZ cameras)
Two dedicated cues let you drive a motorised pan/tilt/zoom (PTZ) camera straight from a cue, with no third-party software: movement, zoom, recall and storing of presets.
VISCA-over-IP
A standard binary protocol, adopted by most pro/broadcast PTZ cameras (Sony and compatibles). Each camera is patched once in Preferences > VISCA (destination, port - 52381 by default -, address on the VISCA bus from 1 to 7), then each VISCA cue picks a patched camera and a command (pan/tilt in the 4 directions + stop, zoom in/out/stop, home position, recall or store a preset from 0 to 127).
ONVIF
An open standard based on SOAP/HTTP, widespread on IP surveillance cameras and some broadcast models. Each camera is patched in Preferences > ONVIF (destination, port, username/password, media profile and service path - to be checked case by case depending on the model, as the default value does not suit every brand). Available commands: continuous movement (adjustable pan/tilt/zoom speeds), stop, home position, recall/store a preset (identified by a free-form name, not a plain number as in VISCA).
Chapter 15
Live inputs (In Video, In Audio)
Two cue types bring live sources into your sequence. They do not play a file but an input configured once in the Preferences (chapter 2), which each cue then references by name.
Cue In Video
Displays a live video input on a projection surface: webcam, USB/PCIe capture card, or NDI source on the network (OBS, NDI camera, mobile app). Same interface as an Image cue: surface, duration (0 = held until stop), full geometry (fullscreen, opacity, scale, position, 3D rotations), video effects, and compatibility with Fade cues.
The source's sound (webcam microphone, embedded audio of the NDI stream) is routed like a Video cue's: master console + per-channel faders in the inspector, adjustable live during playback, with volume fades via Fade cues.
Cue In Audio
Plays a live audio input through the standard routing: any sound card or USB console input, Dante channels (via Dante Virtual Soundcard, which exposes them as a sound card), or the audio alone of an NDI source (the video is then not transmitted, saving network bandwidth). Master console + faders like an Audio cue, optional duration, fades via Fade cues.
Audio/video sync
Some sources deliver the sound behind the picture (common with mobile NDI apps) or the other way round. The A/V sync field of each video input (Preferences > Video > Inputs) delays one or the other: adjust it by ear while an In Video cue is playing, the effect is immediate.
Chapter 16
Text cue and surtitles (.srt)
The Text cue displays text on a projection surface: surtitles for opera or foreign-language plays, accessibility, on-screen messages. The text is multi-line, with the classic style settings: font and size, bold/italic/underline, colour, highlight (colour behind the text), vertical position (bottom by default, centre or top), and a transparent background by default - the text then overlays whatever is already playing on the surface, a video for instance - or the colour of your choice.
Each Text cue has a fade-in and a fade-out (1 second by default) and an optional duration (0 = held until stop). All settings apply live while the text is displayed. The cue's name automatically follows the first line of the text until you rename it.
Key behaviour: launching a Text cue where another is displayed replaces the old one with a crossfade. You chain texts without ever stopping the previous one.
Importing an .srt file
File > Import subtitles (.srt) creates a group containing one Text cue per subtitle. In the booth, everything is driven with the space bar: the first GO shows the first line (the playhead stays on the group), each following GO moves to the next line with a crossfade, and at the end of the file the playhead resumes on the next cue.
Chapter 17
Timeline view
The “⏱ Timeline” button in the toolbar opens a time view of your show below the cue list. It complements the list without replacing it: use it to see overlaps and to set waits. Your choice (open or closed) is remembered from one session to the next.
How to read the view
A cue has no fixed time: it starts when you press GO. The view is therefore computed from pre-waits, durations, post-waits and the Auto-continue (the next cue starts at the same time) and Auto-follow (the next cue starts when this one ends) boxes. Each manual GO closes a block, shown by a dashed “GO” bar. Between two blocks, the view invents no time.
The ruler
The button in the panel bar switches between “Cumulative time”, where blocks are laid end to end on one continuous ruler, and “Time per block”, where each block restarts from zero. In cumulative mode the total shown is a “Minimum duration”: it assumes every manual GO is given without waiting, which never happens in a real show. The zoom and fit buttons in the same bar let you fit the whole show in the available width.
Tracks, cues without duration and groups
Clips are arranged by track: Video, Image, Text, Audio, Control and Flow. Cues without a duration (MIDI, OSC, Stop, GoTo...) appear as diamonds. A disarmed cue is hatched: it keeps its width but takes up no time. A looping media item is drawn over the length of one pass. Groups are unfolded into sub-clips, editable like the others.
Screens and conflicts
Each sub-row carries the name of the screen where the cue is displayed. When two visual cues occupy the same screen at the same time, they are outlined in red, with a warning triangle and a counter in the panel bar: one hides the other. Two audio cues on the same channels mix, and two Text cues on the same surface replace each other, so those are not conflicts.
Adjusting waits
Dragging the body of a clip shifts its entry wait (the pre-wait) and, with it, the rest of the block. Dragging the right edge changes its duration. Dragging the left edge trims its start without moving its end. A badge shows the value during the gesture. Edges snap to those of the other clips in the same block, and holding Alt turns snapping off. A whole gesture is undone with a single Ctrl+Z. The padlock in the toolbar also protects the Timeline: the panel bar then shows “🔒 Locked” and refuses the gestures.
Keyboard
With the view selected: left and right arrows move from one cue to another, Home and End jump to the ends, Shift + arrow moves in steps of 0.1 s, Ctrl + Shift + arrow in fine steps of 0.01 s, and the +, - and 0 keys zoom and fit. Ctrl + mouse wheel zooms around the pointer. The up and down arrows remain those of cue navigation. Double-clicking a clip sets the application's playhead on it.
During playback
A playhead, a green line whose flag sits in the ruler, follows the progress of the furthest-along cue, and a dotted marker shows the cue that will start at the next GO. It is deduced from what is playing: with nothing playing there is no playhead, and with a looping media item it runs past the drawn clip. In coworking, it also advances on a client computer.
Chapter 18
Geometry, mask and warp: shapes, ball and 360° videos
These settings are in Preferences, Video tab, Surfaces sub-tab: choose a surface, then its “Geometry / Mask” and “Warp” tabs. A surface always follows the same path: the image first goes through the warp, which deforms it, then through the mask, which only lets the shape show. The mask is fixed on the output, like a layer mask: it never deforms the image, and it is the warp that fits the image into the shape.
The surface shape
In the “Geometry / Mask” tab, the “Shape” list describes the object you project onto: None (the usual rectangular screen), Ball, Cylinder, Rectangle, Triangle or Polygon. The polygon has 3 to 12 sides; the cylinder is a column (vertical) or a lying tube (horizontal).
- Size: width and height from 5% to 200% of the surface. “Proportions” keeps their ratio when enlarging. “Regular shape” sets a regular shape the full height, “Fullscreen” the whole surface, centred. The rectangle starts full screen; the triangle and the polygon fill their box edge to edge, point up.
- Position and rotation: the arrows move the shape by one pixel, or ten, and “Recentre” puts it back in the middle. The rotation, from -180° to +180°, follows an object set at an angle: it turns the shape, not the content.
The mask
Everything outside the shape is black on the output, whatever happens: even what the warp pushes beyond it, even during a cue fade. The “Mask” list offers “From the shape”, the default, or “From an image”.
“From an image” uses a black and white image, like a layer mask: white is shown, black is masked, grey is half shown, and a transparent area counts as black. The image is stretched to the size of the surface and saved with it: it follows the surface in coworking and on another computer, with no file to carry. Shape and mask combine: a Ball with an image mask projects the video into the ball while cutting out, for example, its stand. Going back to “From the shape” keeps the image for later.
Background outside the projected area
In the “Geometry / Mask” tab, the “Black outside the projected area (hides the desktop)” box sets what is seen around the useful area (warp, keystone, reduced surface). It is ticked by default on a new surface: everything outside the image is black, and a cue fade goes to black. Unticked, the surface stays transparent: a fade goes to whatever is behind it (the desktop, or another surface), which is useful for overlay set-ups such as surtitles. A surface created with an earlier version of the software keeps its earlier setting.
Warp and mapping aid
In the “Warp” tab, the grid deforms the image to fit it into the shape: by hand, point by point, or with the “Mapping aid”, from 0% (the image as it is) to 100% (it fills the shape exactly). Every change shows immediately, with no “Apply” button. The grid points sit on the shape, and a manual adjustment stays attached to its point: changing the percentage does not lose it. At 0%, it is the usual warp.
Spherical media and 360° videos
A media's format is set in its cue (video, stream, image or video input), “Spherical media” group, “Format” list: Normal by default, Domemaster (one circle, a hemisphere), Equirectangular (a 2:1 image covering the whole sphere, the usual format of 360° videos) or Dual fisheye (two circles side by side, from a two-lens 360° camera). With a spherical format, these appear:
- Orientation: three sliders, live, to choose the part of the media facing the audience, raise or lower it on the ball, and turn it around the projector axis.
- Lens (90° to 250°), for the two fisheye formats: the real field of the lens that filmed.
- Mirror: a 360° video or a domemaster is made to be seen from the inside (headset, dome); on the outside of a ball it appears reversed left to right, and “Mirror” sets it the right way round. A world map, drawn as seen from the outside, is not flipped: the content decides.
A spherical media is projected into the shape only on a Ball or Cylinder surface, and automatically; on another shape it goes through as it is, masked. A flat video is never converted on its own: to curve it onto a ball, use the mapping aid.
The test pattern and the preview draw the shape fixed, like the real object: outline, and for a ball its meridians and parallels. Only the test pattern grid shows the warp, so you can see the image slide under a shape that does not move.
Exporting and importing a deformation
“Export deformation…” saves the grid to a .jmqw file, and “Import deformation…” replaces the surface's grid with the one from a file, including one that came from another computer. Only the grid travels: columns, rows, interpolation mode and the position of each point, but not the surface name, its output, its geometry or its edge blending. Importing does not turn the warp on: enable it yourself once you have checked the grid. An inconsistent file is refused with a message.
Chapter 19
AI control (MCP)
JustMakeQ ships an MCP (Model Context Protocol) server, letting a compatible AI assistant (Claude Code, Claude Desktop, Codex...) drive an open session: list, create, edit or reorder cues, fire GO/Stop/Pause.
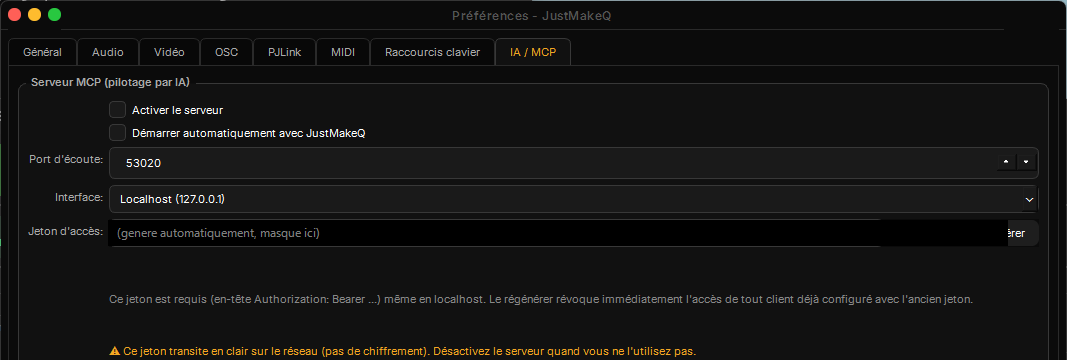
Disabled by default. The listening port (53020) and the network interface (localhost by default) are set here, along with the access token required for any connection.
localhost on a network you do not control. The "Regenerate" button immediately revokes access for any client already configured with the old token.
Once the server is enabled, the tab offers ready-to-copy configuration examples for the main AI clients (CLI command, .mcp.json file, config.toml).
Chapter 20
Coworking
Coworking lets several operators drive the same sequence at the same time from different workstations: a host actually plays the media, connected clients see the state live (cue list, statuses, playhead) and can, depending on their permission level, edit the sequence or fire transport commands.
Available from the File > "Coworking session..." menu: start a session as host, or join a session discovered automatically on the local network. The host approves each new connection manually and can adjust each client's level at any time (read-only, editing, or full control) from the "Collaborators" dialog.
ws://, port 53015): keep it to a trusted technical network, and avoid it on a venue Wi-Fi shared with the audience.
Chapter 21
Troubleshooting
View logs
The "?" > "View logs..." menu opens the folder holding the log files directly, timestamped at every launch. After a crash, that folder contains either a full Python exception or - for a lower-level (native) crash - a separate *_fault.log file with the stack of every thread at the moment of the fault. Attaching these files to any support request speeds up diagnosis considerably.
Common problems
- A Video/Image cue shows nothing: check that a surface is indeed selected in its Settings, and that this surface is linked to a real physical output in Preferences > Video > Routing.
- No sound: check the interface chosen in Preferences > Audio > Routing, and the per-channel routing in the cue's Settings tab.
- An OSC/HTTP/PJLink command does not go out: the "Last response" field (HTTP) or the server status indicators at the bottom right of the main window help confirm that a network connection really exists.
- Licence: the "?" > "Manage licence" menu shows the detailed status; if a network error occurs during activation, the message now states the cause (system clock, firewall, DNS, proxy).
For any question not covered here, the Support page lets you contact the team directly.